Project Menu
From Shoot Em Up Kit
The Project Menu is displayed when a new project is created or an existing one opened. It has links to all the Editors and Settings used to build a game. To return to it while creating a game, click the ![]() Menu icon on the Tool Bar. You can also move between Editors using the icons on the Tool Bar.
Menu icon on the Tool Bar. You can also move between Editors using the icons on the Tool Bar.
For a new game, a good place to start is the Level Editor to start placing items to build a level or the Sprite Editor (for 2D sprites) or Entity Editor (for 3D models) if you want to import your own artwork.
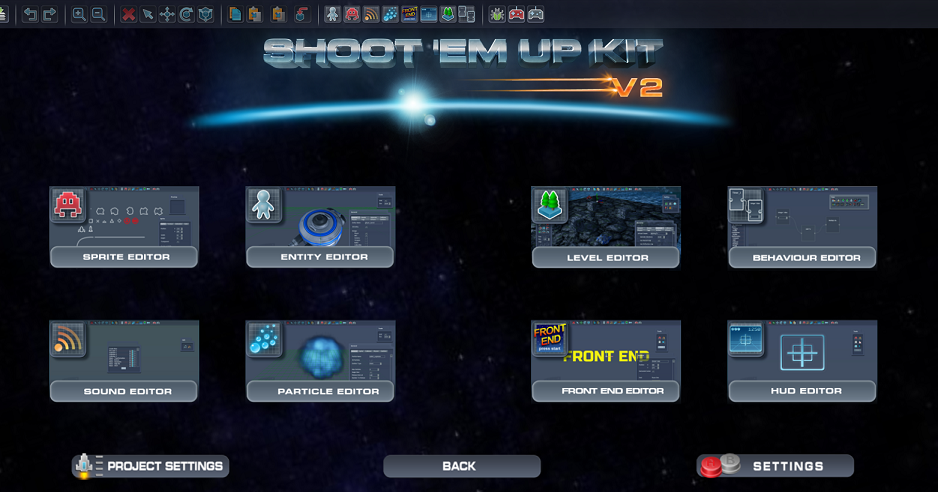
Sprite Editor - If you create your own 2D graphics then the Sprite Editor enables you to tell the Shoot ‘Em Up Kit where each sprite is on the texture (if there are more than one). You can also combine multiple images to create an animated sprite. Collision masks can also be defined for each sprite, allowing the sprite to collide in a different way from its appearance.
Entity Editor - Used to make game entities out of sprites or models. You can choose which shaders to use, select how collisions will be detected, set the physical properties of the entity, and set tags to identify important positions on the model or sprite such as a gun or thruster position.
Level Editor - Used to build a game by placing Entities into the map, as well as placing other objects such as triggers, sounds and checkpoints and setting up backgrounds, music and ambient lighting. The objectives for the level can also be set so that, for instance, the level will be complete when a timer has expired.
Behaviour Editor - Used to create custom behaviours for the game. Example behaviours could include giving a bonus life when 10,000 points have been reached, or triggering a sound effect during the last few seconds of a timer. Properties for any of the Entities or game objects can be modified using behaviour instructions
Sound Editor - Used to tell the Shoot ‘Em Up Kit about any sound effects or music you create. This could include whether it is a stereo or 3D sound, whether it should be looped – meaning it would be played continuously - and whether any subtitles should be displayed. Individual sounds can be grouped to form a Sound Cue which, when
played, selects a random sound from the group. This avoids repetition and phasing effects.
Particle Editor - Used to build eye-catching particle effects out of sprites or models. You can set the number of particles which will be emitted, the speed and
direction of travel, their colour and number of other parameters. Particles can also contain physical and collision properties so that they interact with the environment.
Front-End Editor - Used to create all the screens which the player sees before, in-between and after the main game is played. Examples include the title page, the pause menu, and the high-score table. Text, graphics and sound can all be added to each page.
HUD Editor - Used to create the heads-up display (HUD) which shows the in-game information, such as score, lives and health, which is overlaid on the display for the player to see. In the HUD Editor text and graphics can be added to the HUD, and these can be linked to data so that, for example, the player’s score or number of lives is displayed.
Settings - Opens the Settings window which is used to set the volume level, whether subtitles should be displayed, and the method of control - keyboard, joystick, xbox 360 controller or touch. All these options apply to playing games and not the editor.
Back - Return to the Create Menu
Project Settings - Opens the Project Settings window which is used to set such as the project name, whether it is 2D or 3D and the screen resolution.