Building the Omni-Directional Template
From Shoot Em Up Kit
Templates
This tutorial explains how we built the Side Scroller template. The template is included ready-made in the Shoot 'em Up Kit and you can create a new game using it as a starting point.
Build the Game
Create a new Empty Project
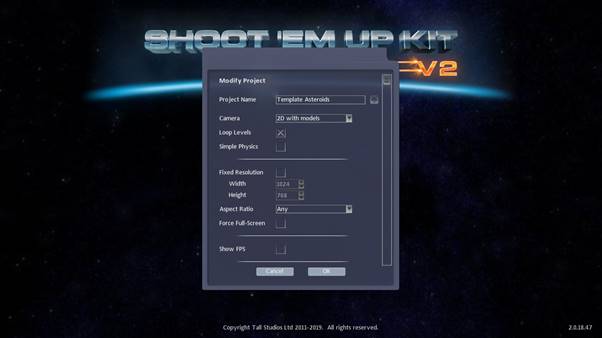
Give the project a name.
Select 2D with models
Click the OK button to create the project.
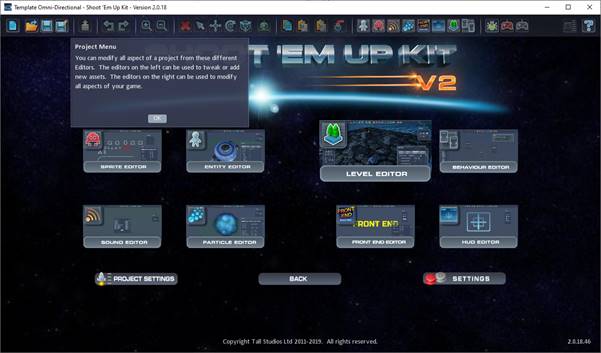
Select the Level Editor
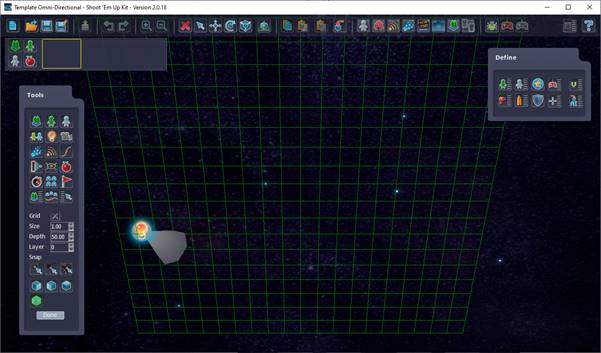
The scene is empty except for a single directional light. A grid to help visualise the area is shown. Because we selected to create a 2D game the objects we place will be placed on this plane by default.
The first thing we will add to the scene is a ship for the player to control. Click on the ![]() Player button on the Tools Menu and select Drone 02.
Player button on the Tools Menu and select Drone 02.
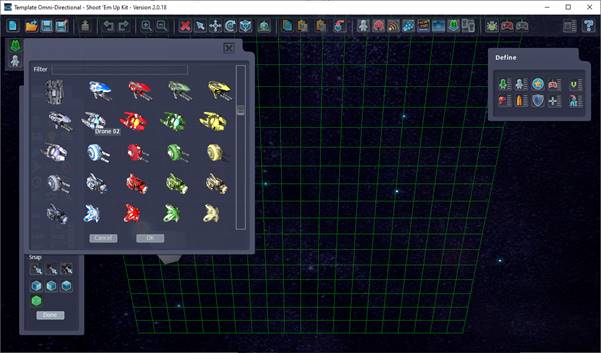
Then place the ship somewhere near the centre of the screen.
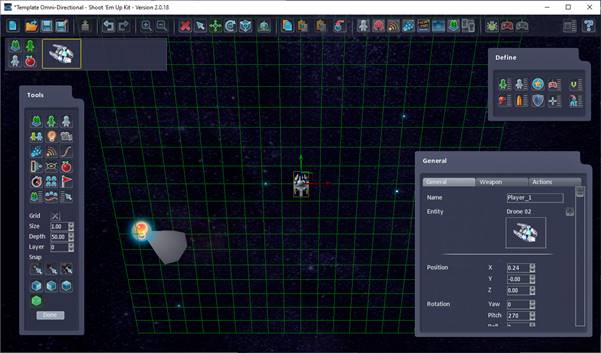
The player is automatically set-up to react to player input and move. But we can’t test the game just yet as there aren’t any enemy and the project is currently set up to expect enemy. We can change this by clicking the ![]() Level Settings button on the Tools window.
Level Settings button on the Tools window.
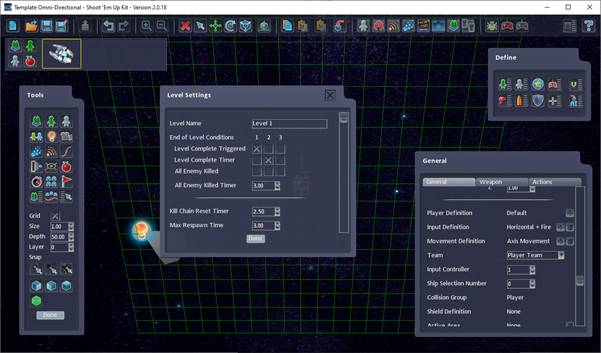
Clear the checkbox on the 3rd column of the End of Level Conditions row. This means the level won’t be complete when all enemy are killed, but it also means no enemy are required in the level (there had to be at least one for the player to be able to kill them all).
Now that no enemy are required, there is nothing to stop us from testing our level. Clicking the ![]() Test Game or
Test Game or ![]() Test Level buttons on the Tool Bar will start the game and we can move the player ship left and right. We can also fire our default weapon.
Test Level buttons on the Tool Bar will start the game and we can move the player ship left and right. We can also fire our default weapon.
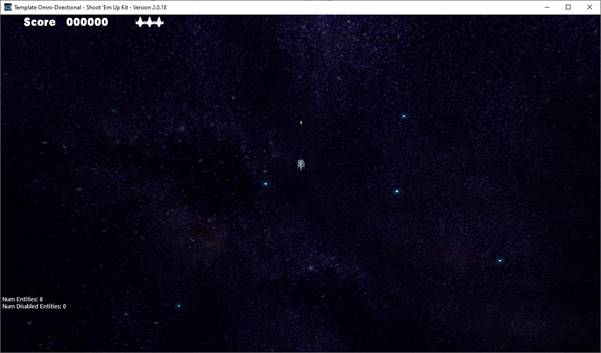
Press the Escape button to return to the editor.
Click on the Player ship and the Properties window will open. Scroll down the properties window until you see the Player Definition, Input Definition and Movement Definition.
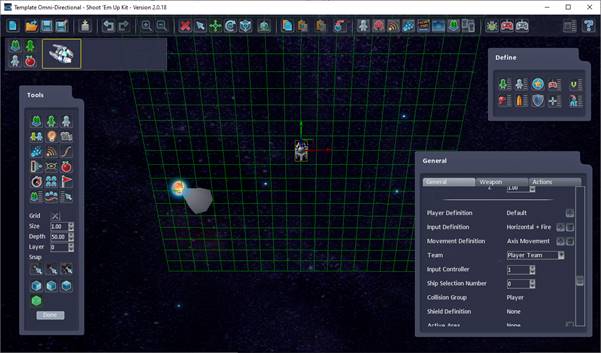
Definitions are a small collection of properties that you can tweak for you project. The Player Definition, for example, has properties such as the number of lives, Health, and how long the player is invulnerable at the start of a game.
You can apply the same Definitions to multiple items in the scene. For example, you can have an NPC Definition shared by all the NPCs in a formation so that each NPC has the same health – and tweaking the NPC definition will affect all the NPCs which are using it.
For making an omni-directional shooter we need to change the Input Definition, which specified what action each input button or axis performs. And we also need to change the Movement Definition to use rotational movement.
Click on the Input Definition, which is currently set to Horizontal + Fire. Select Rotate Yaw + Fw & Bk.
Click on the Movement Definition, which is currently set to Axis Movement. Select Rotate.
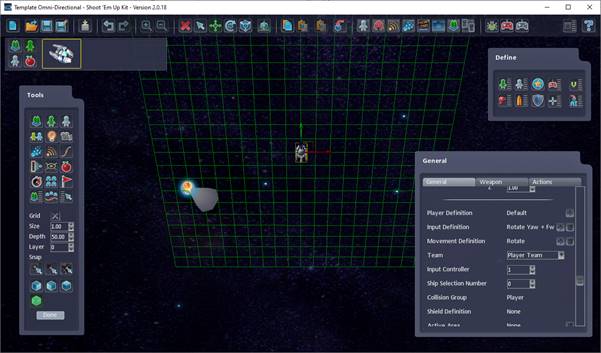
Click the ![]() Test Level button on the Tool Bar. You can now rotate the ship using the Left and Right axis; and move forwards and backwards using the Up and Down axis. The ship will fire in the direction it is facing.
Test Level button on the Tool Bar. You can now rotate the ship using the Left and Right axis; and move forwards and backwards using the Up and Down axis. The ship will fire in the direction it is facing.
Adding Inertia
The player’s ship moves and rotates exactly to match the player’s controller input. When the player moves the controller then the ship immediately moves. And when the player stops moving the controller the ship immediately stops too. This feels very responsive but also look unnatural. When something big is moving quickly it doesn’t immediately stop. Moving objects can build up momentum and it takes a while to bring them to a full stop. This is known as inertia.
There are two approaches to adding inertia to in-game objects:
The first is to use a full physics simulation, where the object’s mass, friction and other properties are combined with gravity and movement forces to simulate the movement of the objects in a realistic way. We will cover this in another tutorial.
The second method is to tweak the values in the Movement Definition to specify how long you would like it to take for the ship to reach full speed when the player moves the controller; and how long you would like it to take to stop when the controller is released.
Open the current Movement Definition (Rotate) by clicking the Go to Definition arrow button next to it. Alternatively, you can click on the Movement Definition button in the Define window and, when the Movement Definition list opens, select Rotate from the list.
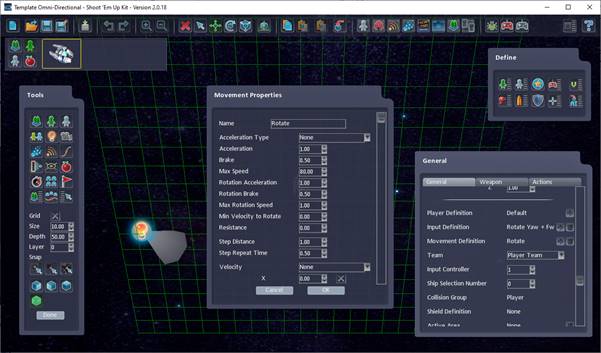
By default, the Acceleration Type is set to None. This means there will be no acceleration or braking when the player moves the controller. The ship will move from 0 to maximum speed in an instant.
We will change this to something smoother. Click on the Acceleration Type dropdown box and select Quadratic.
As a quick overview, other options we had were:
None, as was mentioned before, switches between Max Speed and stationary in an instant. If the player moves their controller then the ship will switch to full speed in the appropriate direction. When the player releases the control the ship will stop moving in that direction. This feels very responsive but can also feel unrealistic.
None Proportional is the same as None (the default we tested earlier) except it considers how far the player has moved the controller on the axis. If the player has only moved the left-stick halfway, then the ship will only move at half the maximum speed.
Linear, which will accelerate to the maximum speed using a fixed-step linear acceleration. 10%, 20%, 30%, etc. There is no smooth curve to simulate the struggle to get the ship moving.
Linear Proportional is the same as Linear except it considers how far the player has moved the controller on the axis. If the player has only moved the left-stick halfway, then the ship will only accelerate to half speed.
Quadratic will accelerate to the maximum speed using a gentle quadratic curve which accelerates slowly at first, then quite quickly, and them smooths off towards the end. It is a popular control method in modern videogames.
Step will cause the player ship to snap between positions rather than move smoothly. This is good for games that want a retro feel.
The two main values we will tweak to get the feeling we want are the Acceleration and Brake. These values are both times in seconds. Our Acceleration is currently set to 1.0 and so it will take 1 second to get from standing still to moving at full speed. Try setting this to 3 seconds and notice how sluggish the ship feels. Change the value to 3.0 and click the OK button to apply the settings. Click the ![]() Test Level button or press the F5 shortcut.
Test Level button or press the F5 shortcut.
The ship stops quite quickly at the moment. We will increase the Brake time to 2 seconds to simulate a lot of inertia. Change the Brake value to 2.0 and click the OK button.
Click the ![]() Test Level button or press the F5 shortcut. The ship now takes a lot longer to come to a halt.
Test Level button or press the F5 shortcut. The ship now takes a lot longer to come to a halt.
I’ve chosen to go with an Acceleration time of 0.5 seconds and a Brake time of 0.75 seconds. The ship accelerates quickly and slows down slightly slower to give a feeling of weight and inertia.
If the player moves forward on the controller and then backward then the ship will use its Brake time to come to a stop and then it’s Acceleration time to accelerate backwards. This is all done in one fluid motion but can be thought of as two separate steps.
These values will only affect the movement forwards and backwards of the ship. We can adjust the Rotation Acceleration time and Rotation Brake time too. The Rotation Acceleration time and Rotation Brake time will allow us to control the responsiveness of the rotation in the same way as we control the forward and backwards movement.
Scenery
We are going to add some scenery next. This will help us to get a feeling of speed and movement when we add the camera in the next step.
We will use a sprite background, which is automatically setup for us when we first create a game. And we will also add a procedural background of stars that will move with the camera to help provide the feeling of motion.
Open the Level Settings, using the ![]() Level Settings icon on the Tools Window. Scroll down until you see the Background Settings button. Click it and you will see options for the background.
Level Settings icon on the Tools Window. Scroll down until you see the Background Settings button. Click it and you will see options for the background.
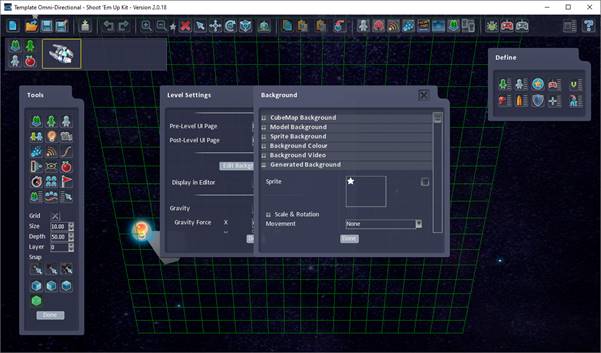
There are a few options to choose from. If we don’t have any of the cubemaps, models, sprites, videos, etc. then a background colour will be used.
A cubemap is a textured box that surrounds the level. The cubemap moves with the camera and so you never get closer to the walls of the box.
The Model background enables a model to be used. The model is always centered around the camera and so never appears to move.
The background video enables a video to be played as the background. This is streamed in as the level plays. The video is unaffected by the camera direction.
The Sprite background provides a static image which is unaffected by the camera direction.
The final option, and one we will use here, is Generated Background. This allows us to specify a sprite and a density and the Kit will generate a random background for you. We will use this to create a starry backdrop.
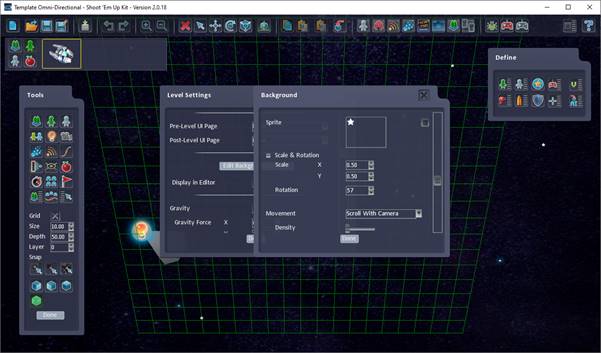
Click on the Sprite box and select the sprite in the shape of a star.
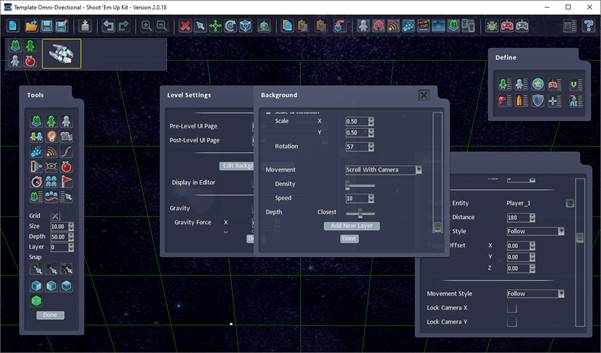
Open the Advanced menu (the [+] button) to change the scale to 0.5 for the X and Y.
Change the Movement type to Scroll with Camera.
You will see some stars appear in the background. Try moving the Density slider to see how it affects the number of stars. It is best to keep this low for now as we can add more layers later to create cool parallax effects for a feeling of depth.
Camera Tracking
We are now ready to add a camera to follow the player’s ship.
Click on the ![]() CameraShot button from the Tools window and place the green target over the player’s ship.
CameraShot button from the Tools window and place the green target over the player’s ship.
Once you have placed the camera, we want to set the Camera to follow the player. Scroll down the Properties window and find the Tracking Entity property. Click on the default, None, and when the selection window opens up select Player_1.
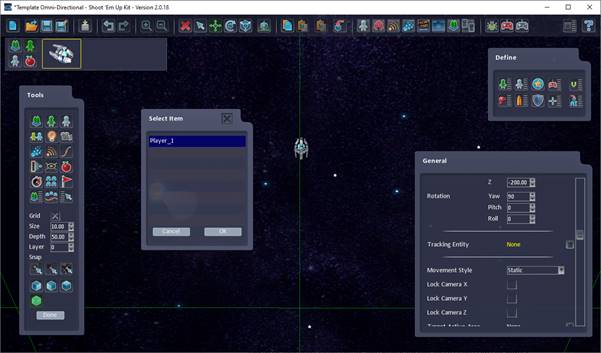
We will increase the Tracking distance, which affects how far the camera will be from its target (the player ship) to 180 units.
We will enable the camera to track where the target moves to by setting the Tracking Style to Follow.
We will also allow the Camera to move with the player by setting the Movement Style to Follow.
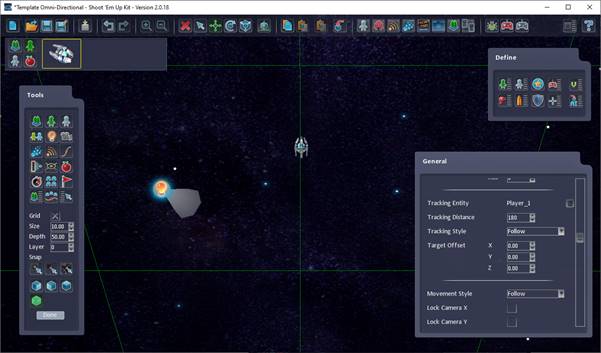
Interesting camera effects can be created by allowing a camera to track the player but not follow it; move in a preset direction using a fixed velocity; or having the camera constrained to a spline.
We can now ![]() test the level and you will see the player will remain in the centre of the screen, as the camera’s focus point, and that the stars will move slowly as you fly forward.
test the level and you will see the player will remain in the centre of the screen, as the camera’s focus point, and that the stars will move slowly as you fly forward.
To make the stars move faster, go back to the Background Settings and change the Speed property to 10.
Enemy
The last step we will take is to add some enemy for the player to attack and avoid.
There are two approaches we can take to this. The first is to add enemy NPCs around the level. We can set them to only activate once they appear on-screen by using the Enable when on Camera option in the enemy’s NPC Definition. This is a good method if you’re planning on adding scenery to the level so the player has a clear idea where they are and where they can find the enemy.
The second method, and the one we will be using in this tutorial, is to use NPC Generators to spawn enemy NPCs from locations outside of the player’s view. We can tell the NPC Generators to move with the player (to use locations relative to the player) so that wherever the player goes the NPC Generators will go too – always keeping their positions relative to the player.
Select the ![]() NPC Generator on the Tools Menu and Select Drone 02-B.
NPC Generator on the Tools Menu and Select Drone 02-B.
Zoom out a little (using the mouse wheel) and click to place a spawn point somewhere near the left edge of the screen, slightly higher than the player. An icon will appear to show the spawn point has been placed.
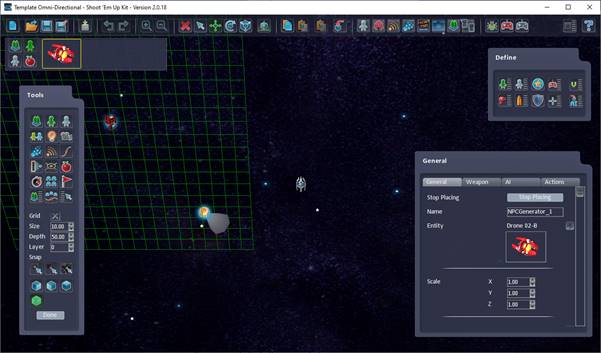
We’ll add a second spawn point a little lower.
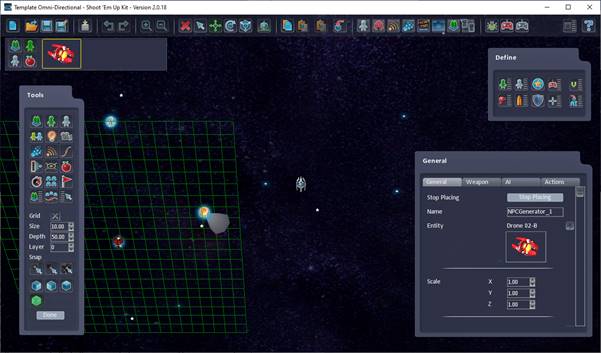
We will just place these two for now. To stop placing you can either hit the Stop Placing button on the General properties pane or press the Esc key on your keyboard.
Click on each node and change the Rotation to Yaw 90, Pitch 0 and Roll 0. This will make the NPC face to the right.
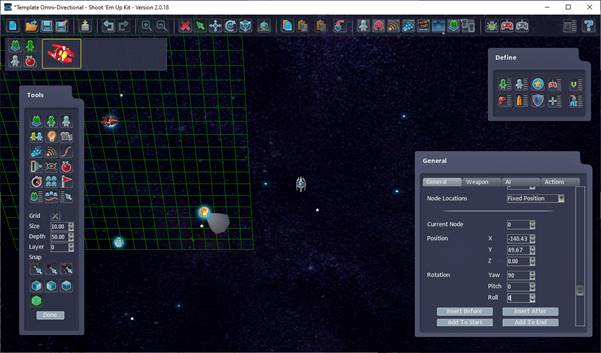
We will now make the NPC fly to the right. We will do this by adding an AI behaviour. Click the AI tab on the property window. By default it will have two AI behaviours: Fire and Chase. Delete the Fire behaviour by clicking the ![]() Trash button next to the AI Type.
Trash button next to the AI Type.
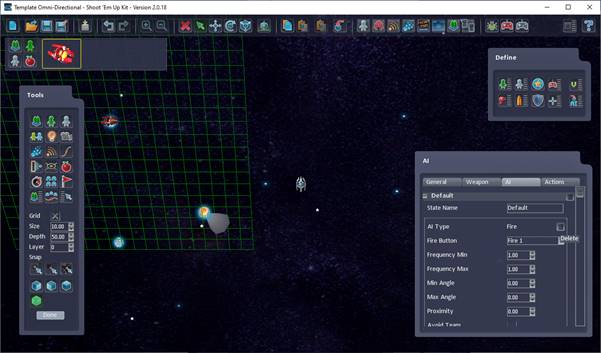
We will change the Chase behaviour to the Move +X behaviour, which will make the NPC move in the +X axis.
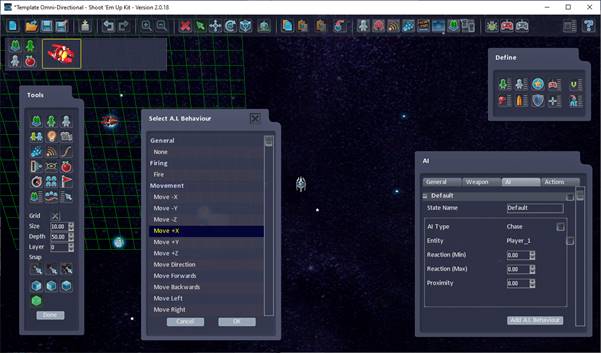
Click the OK button and the behaviour will change.
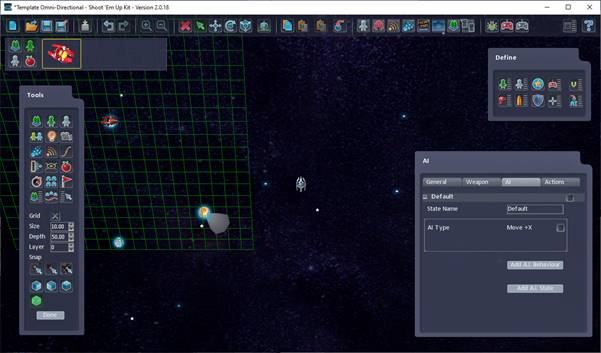
We can now ![]() test the level and will see the NPC fly across the screen from left to right. If you don’t see it then you might need to move the NPCs closer to the player on the Y axis (i.e. not as far up or down) as they may be spawning too high or low to be visible on screen.
test the level and will see the NPC fly across the screen from left to right. If you don’t see it then you might need to move the NPCs closer to the player on the Y axis (i.e. not as far up or down) as they may be spawning too high or low to be visible on screen.
If you test the level several times you will notice that it chooses a random spawn point each time.
We will now modify the NPC Generator so that it will generate an NPC every 5 seconds until it has spawn 20 ships.
Go back to the General pane of the NPC Generator and scroll to the Min Spawn Time property. This will be the minimum amount of time that must past before spawning a new enemy. We will set this to 5 so that at least 5 seconds must pass. We can set the Max Spawn Time to any higher value and it will spawn an NPC at a random time between the Min and Max Spawn Time values. If we set the Max Spawn Time to 10 seconds, then it will wait for a random time between 5 seconds and 10 seconds before spawning each NPC.
The Min Generated and Max Generated control how many NPCs are generated each time. If we set the Min and Max Generated to 2 then it will spawn 2 NPCs each time, one at each of our spawn points. If we set the Min Generated to 1 then it will generate at random either 1 or 2 NPCs each time. We will leave these values at 1 for now so that only 1 NPC is being spawned each time.
The Max Active property lets us limit how many active NPCs there can be in the scene. If the number of NPC that has generated, and those NPCs are still active in the scene (i.e. haven’t been destroyed) reaches the Max Active limit then the NPC Generator won’t spawn any more until some of the existing NPCs have been destroyed or deactivated. We will leave this value at its default of 99.
The Max Can Generate property allows us to specify how many NPCs the NPC Generator will spawn in total throughout its lifetime. We will increase this value to 20.
The last property we want to change is the Node Locations property. This allows us to specify whether the NPC Generator spawn point nodes are in a fixed position in the level, so the player can fly closer to them or fly away from them. We can set them to be Player Relative so that they remain a fixed distance from the player, even as the player moves. We can also set them to be camera relative so that they stay a fixed distance from the camera.
In our game the camera is tracking the player and so moves with the player, so we could choose to make the Node Locations either Player Relative or Camera Relative. I suggest Player Relative as we may decide to do some camera effects in the future which would then affect the NPC spawn points.
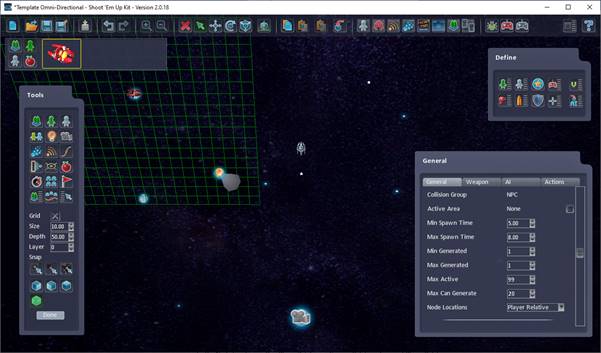
We now have a game where enemy will keep spawning (5 to 8 seconds apart) to the left of the player ship, regardless of where the player flies.
How can we improve this game template?
Add an objective. The player is flying aimlessly at the moment.
Add more NPC Generators. Create new NPC Generators to spawn nodes at the top of the screen; over to the right; and some more at the bottom. Each can have a different AI style.
Add Generators which spawn NPCs that can rotate (use an NPC Definition Rotate and the Movement Definition of Rotate) and set the AI Type to Chase. Have this spawn less frequently.
Create some upgrades. These could be spawned by an NPC Generator and could activate new weapons, shields or give score or time bonuses.