Difference between revisions of "Front-End Editor"
From Shoot Em Up Kit
(Created page with "===Introduction=== The front-end editor is used for creating and modifying the menu, instructions, credits and all the other pages which lead into and out of the actual game....") |
|||
| (One intermediate revision by the same user not shown) | |||
| Line 33: | Line 33: | ||
<div class="mw-collapsible mw-collapsed" id="mw-customcollapsible-Sprite"> | <div class="mw-collapsible mw-collapsed" id="mw-customcollapsible-Sprite"> | ||
| − | {| | + | {|class="wikitable" |
!rowspan="14" style="width:260px;vertical-align:top;" |[[File:FESprite.png|link=]] | !rowspan="14" style="width:260px;vertical-align:top;" |[[File:FESprite.png|link=]] | ||
|style="width:120px;" |'''Sprite''' | |style="width:120px;" |'''Sprite''' | ||
| Line 85: | Line 85: | ||
Add text to the HUD - drag into position using the mouse. Text can be fixed or used to display data such as score or lives. <span style="color:#008CC9;" class="mw-customtoggle-Text">[+Show more]</span> | Add text to the HUD - drag into position using the mouse. Text can be fixed or used to display data such as score or lives. <span style="color:#008CC9;" class="mw-customtoggle-Text">[+Show more]</span> | ||
<div class="mw-collapsible mw-collapsed" id="mw-customcollapsible-Text"> | <div class="mw-collapsible mw-collapsed" id="mw-customcollapsible-Text"> | ||
| − | {| | + | {|class="wikitable" |
!rowspan="10" style="width:260px;vertical-align:top;" |[[File:FEText.png|link=]] | !rowspan="10" style="width:260px;vertical-align:top;" |[[File:FEText.png|link=]] | ||
|style="width:150px;" |'''Text''' | |style="width:150px;" |'''Text''' | ||
| Line 130: | Line 130: | ||
The page ''Properties'' window is used to set music, how long the page will be shown, which pages will be shown next, as well as specifying visual effects. <span style="color:#008CC9;" class="mw-customtoggle-Props">[+Show more]</span> | The page ''Properties'' window is used to set music, how long the page will be shown, which pages will be shown next, as well as specifying visual effects. <span style="color:#008CC9;" class="mw-customtoggle-Props">[+Show more]</span> | ||
<div class="mw-collapsible mw-collapsed" id="mw-customcollapsible-Props"> | <div class="mw-collapsible mw-collapsed" id="mw-customcollapsible-Props"> | ||
| − | {| | + | {|class="wikitable" |
!rowspan="9" style="width:260px;vertical-align:top;" |[[File:FrontEnd3.png|link=]] | !rowspan="9" style="width:260px;vertical-align:top;" |[[File:FrontEnd3.png|link=]] | ||
|'''Page Name''' | |'''Page Name''' | ||
| Line 160: | Line 160: | ||
|} | |} | ||
</div> | </div> | ||
| + | |||
| + | |||
| + | ===[[File:ToolsMenu18.png|link=]] Select an Item=== | ||
| + | |||
| + | [[Select an Item | Select an Item]] on the page. | ||
| + | |||
===Co-ordinates=== | ===Co-ordinates=== | ||
Latest revision as of 17:39, 22 January 2021
Contents
Introduction
The front-end editor is used for creating and modifying the menu, instructions, credits and all the other pages which lead into and out of the actual game.
You can also control how the pages flow together (which page follows which) and whether the pages will change backed on user input or from a timer.
Front-End pages can also be created as overlays at the start and end of a level, these can be set in the Level Settings.
Using the Front End Editor
The first step when using the Front-End editor is to select which page you would like to modify.
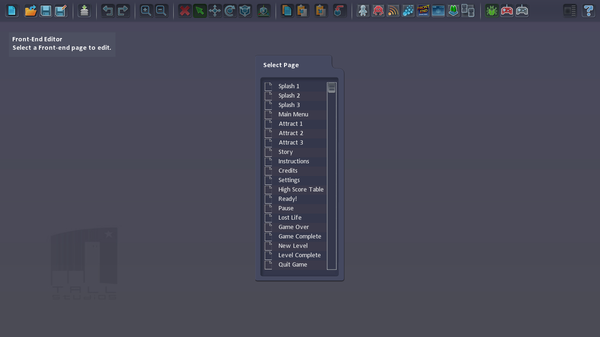
Once you have selected a page you will see the Tools window.
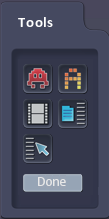
The buttons allow you to add Sprites, Text, Video and set the page properties. Clicking the [Done] button will close the page you are editing and return you to the page selection list.
 Sprite
Add a sprite - select from the list displayed and drag into position using the mouse. Sprites can be used to display data, eg a row of player sprites showing lives left or a health bar changing length. [+Show more]
| Sprite | Sprite to display | |
| Position | Position of the sprite - change values or select and drag using gizmo to move | |
| Rotation | Rotation of the sprite | |
| Scale | Scale of the sprite | |
| Full Screen | Check box to make the sprite full screen | |
| Horizontal Centre | Check box to centre sprite on screen | |
| Draw Depth | Used to set whether sprites are in front of or behind each other | |
| Colour | Use sliders or click colour panel to open selector | |
| Entry/Exit Effect | Set text to fade or move in and out | |
| Value | Select game data to be displayed eg score, health | |
| Format | Format for sprites eg horizontal or vertical row (for lives), truncate horizontal or vertical (health bar) | |
| Custom | Eg if max health is 80, select Format truncate 0-custom and set Custom to 80 so the full health bar sprite will show at health 80 and it will truncate as health decreases, so half will be shown at health 40. | |
| Action On Click | Action to perform on click: - Switch controller - options are Keyboard, DirectInput Joystick, XBox Controller, Touch, Use Sensors - Volume Up/Down - Switch to FullScreen - Go to Settings - Go to Menu - Go To Instructions - New Game - Continue Game - Save Game - Load Game - Exit App - Set Custom Variable - Set Player Ship (for player ship selection) | |
| Click by | Set which players can click this sprite |
 Text
Text
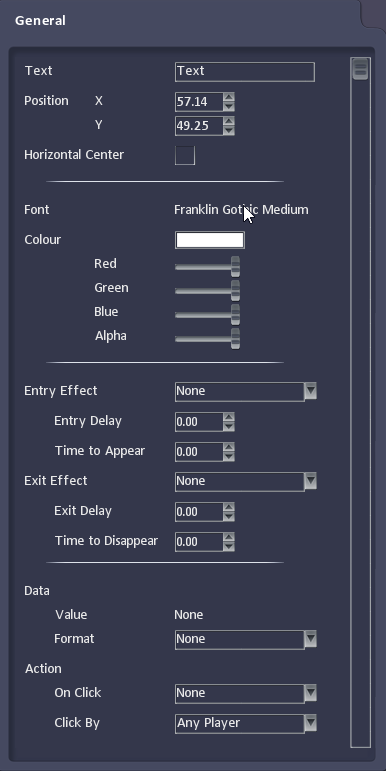
Add text to the HUD - drag into position using the mouse. Text can be fixed or used to display data such as score or lives. [+Show more]
|
Text | Text to display |
|---|---|---|
| Position | Position of the text - change values or select and drag using gizmo to move | |
| Horizontal Centre | Check box to centre text on screen | |
| Font | Select font style and size | |
| Colour | Use sliders or click colour panel to open selector | |
| Entry/Exit Effect | Set text to fade or move in and out | |
| Data | Select game data to be displayed eg score, health | |
| Format | Format for text eg plain text, time | |
| Action On Click | Action to perform on click: - Switch controller - options are Keyboard, DirectInput Joystick, XBox Controller, Touch, Use Sensors - Volume Up/Down - Switch to FullScreen - Go to Settings - Go to Menu - Go To Instructions - New Game - Continue Game - Save Game - Load Game - Exit App - Set Custom Variable - Set Player Ship (for player ship selection) | |
| Click by | Set which players can click this text |
 Video
Video
Add a video - select from the list displayed.
 Properties
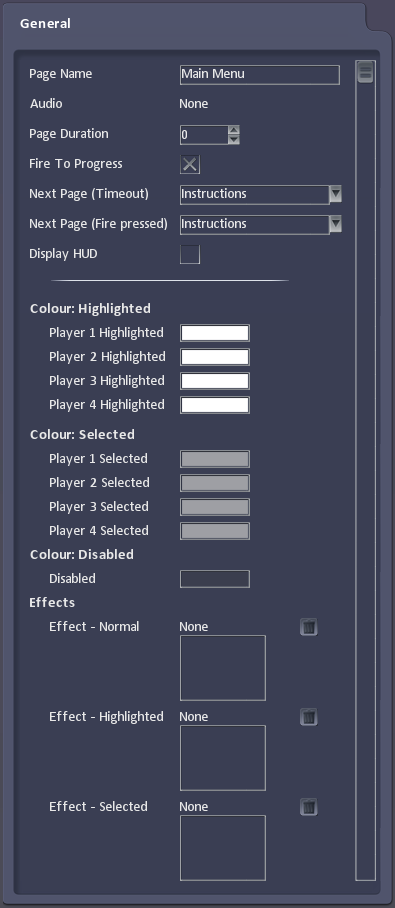
The page Properties window is used to set music, how long the page will be shown, which pages will be shown next, as well as specifying visual effects. [+Show more]
|
Page Name | Name of the page. |
|---|---|---|
| Audio | Sound Cue to play when page opens. | |
| Page Duration | Time to display page for (set to 0 to make Fire to Progress only). | |
| Fire to Progress | Check box to close page when Fire button is pressed. | |
| Next Page (Timeout) | Page to display next if this page times out (when Page Duration is set) | |
| Next Page (Fire Pressed) | Page to display next if the player hits Fire to leave the page (if Fire to Progress is selected) | |
| Display HUD | Whether the HUD should be displayed when this page is shown | |
| Colour: Highlighted Colour: Selected Colour: Disabled |
The Front-End user interface supports up to 4 players and you can set different colours for highlighted, selected and disabled items for each player. | |
| Effect: Normal Effect: Highlighted Effect: Selected |
The Front-End user interface supports up to 4 players and you can set different Particle Effects for normal, highlighted and selected items for each player. Text and Sprites can be set to move based on the position, rotation and scale set by a particle system. |
 Select an Item
Select an Item on the page.
Co-ordinates
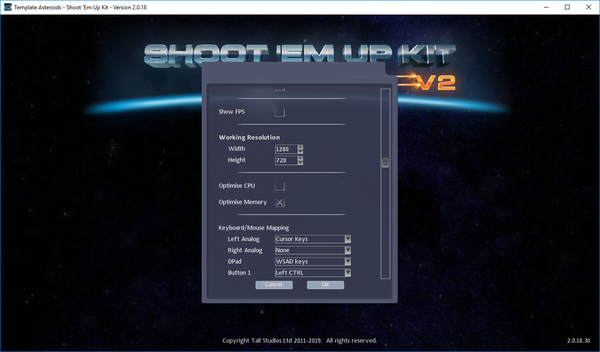
Because PCs have different resolutions, the co-ordinate system in the Shoot ‘Em Up Kit is based on a Working Resolution which can be set in the Project Settings.
The Working Resolution is the resolution you will work at when designing your HUD, User Interface and 2D Sprite only games. You don’t have to run the Shoot ‘Em Up Kit at this resolution, it is just a reference width and height so that the Shoot ‘Em Up Kit knows what to do if your game is run on a PC with a different resolution.